

Systematic process of creating a redwood sandblasted sign
Systematic process of creating a redwood sandblasted sign
Every great redwood sandblasted sign starts with a great design. This involves meeting with the client and determining what the message of the sign need to convey to the customer. Once the final design is determined it is time to start preparing our redwood blank.
 Step one: We need to select the proper boards for the size sign we are about to make. Redwood comes 11 inches wide in lengths of eight to twenty-two feet. For this sign, we are making the finished size thirty-six inches wide by twenty-four inches tall. This means we will need three pieces of redwood to make the height and we will cut the width of the boards to thirty-eight inches so we can cut the final shape out of the boards once they are glued together.
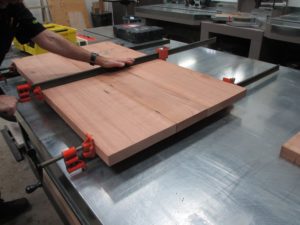
 Step two: Once we have our board cut to size it is time to join them together. To accomplish this, we need to arrange the boards on the bench alternating the natural cup of the boards; up, down, up. This is to prevent warping of the sign years down the road. Once they are arranged we make pencil lines every twelve to sixteen inches apart from each other to give us a line to know when to drill a 3/8-inch hole to place a dowel peg.
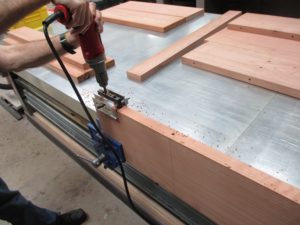 Step three: We take each one for our boards and insert then vertically into our bench vises. Then we take a vertical drill guide and line it up with each one of our pencil lines we made earlier. We drill down about one inch into the redwood. Then we repeat this process for every pencil line. At this point it becomes a two-person job, one to move the jig and one to drill the holes.
 Step four: Now that all the holes are drilled we are ready to glue the boards together. We position the boards on end in a vise and clap them down. Next, we will apply a liberal amount of a water based redwood glue on the seam and into the dowel hole. Next, we insert a two-inch wood peg into the hole and apply glue to the top of the peg.
Once that is complete of that seam we stack and line up the next board and press it down onto the pegs sticking up. Once we have the three boards all glued and aligned we then clamp them together, alternating clamp on each side of the redwood black to prevent putting too much tension onto one side of the sign. The glue needs 24 hours to set, so the next day we will remove the clamps and move on to step five.
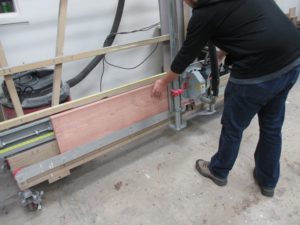
 Step five: We are ready to cut our blank to the desired shape and size of our finished sign. For this sign, it is an oval shape. We use a computer cut vinyl stencil to give us the exact shape and size. We carefully place the template on the redwood aligning the board joints parallel to the center of the template. To cut this shape we use a jig-saw with a fine cut wood blade. Next, we need to sand the boards joints smooth, for this we use a 4’’ belt sander with sixty grit sand paper. Once the sign is smooth we can move on to the finish sanding with a palm sander with 150 grit sand paper.
 Step six: With the sign being finished sanded we can move on to the first coats of primer. For this we use a specialize clear bonding primer made for redwood sandblasted signs. It is a clear primer that give us a glossy surface to allow us to adhere our sandblast stencil to. We apply two coats of this primer allowing 24 hours of dry time in between each coat for it to fully cure.
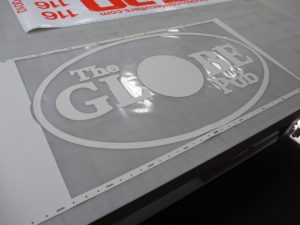 Step seven: Once the primer is completely dry we can cut our sandblast stencil and apply it to our sign. For this process, we use a thirty-inch roll of sandblast stencil. This material is a 1/16-inch-thick rubber mask with a pressure sensitive adhesive on the back. With our computer programs, it allows us to plot any shape and design we can image. Once the computer is done cutting the stencil we can weed out the excess material we do not need to cover our sign. The areas we weed out will become the recessed areas of our sign.
 Step eight: With the computer cut stencil weed out we cannot apply it to our sign. To do this we will need to lay a low tack sheet of pre-space over the stencil so we can transfer it to our sign. Then once again we need to line up our stencil parallel to our board joints so the grain run horizontal. Appling the stencil is easy, apply a little pressure with a roller and you are good to go. Then we finish our signs off with duct tape around the edges to protect the signs when we blast them with sand.
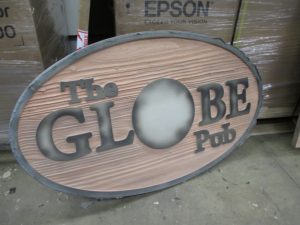 Step nine: Sandblasting! Now the sign is ready to be sandblasted, to accomplish this process that take mother nature hundreds of years we speed it up to twenty minutes with high pressure sand. The sandblaster shoots the sign with sand pressurized to one hundred and thirty pounds per square inch. In about twenty minutes the sandblaster can remove about 3/8 inch of redwood exposing the nature beauty of the redwood. When you see the high spots in the grain patter that is more dense wood than the low spots. This gives each redwood sign a different and unique look. The final look of the sign is ultimately determined by mother nature and no two sign are ever the same.
 Step ten: Removing the rubber stencil. There is so much heat generated in the sandblasting process it actually turns the rubber stencil black around the edges. Once all the rubber stencil is removed we can move on the final hand painting steps.
Step eleven: Priming and painting the sign. Each sign gets two coats of primer and one coat of paint. We use One-Shot hand lettering paints which allow us to get vibrant and brilliant colors that last the life time of the signs. This process could take up wards of a week to allow proper cure times in-between colors and coats.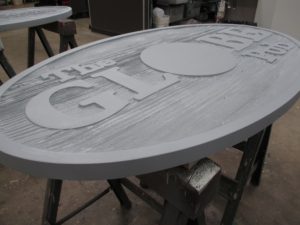
Step Twelve: Your sandblasted sign is ready for installation. This is truly on of my favorite signs, when you can take a raw piece of lumber and turn it in to a work of are anyone can be proud of.
Check out more hand painted sandblasted at the link below!
https://signpalace.com/portfolio/sandblasted-hand-painted-signage/